Choosing the right beam angle is crucial in lighting design as it determines the direction and spread of emitted light. A narrow beam angle focuses light, making it perfect for accentuating specific objects or areas. Conversely, a wide beam angle provides broader coverage, suitable for general lighting purposes. By selecting the appropriate beam angle, one can ensure proper illumination, enhance aesthetics, and create the desired ambiance in different settings. This not only improves visual comfort but also avoids shadows and glare. Additionally, optimizing energy efficiency is possible by directing light precisely where needed, reducing wasted light and energy consumption.
What is Beam angle?
A beam angle refers to the extent of the spread of light emitted by an LED fixture or a lighting source. It determines the width of the light beam and how it illuminates a particular area or object. The beam angle is measured in degrees and indicates the coverage area from the light source to the point where the light intensity decreases significantly. The area directly below the light source is usually the brightest. The angle formed from the most intense axis of the light source to the point where the light intensity drops to 50% on either side is referred to as the beam angle. The larger the beam angle, the softer the resulting light spot. Conversely, a smaller beam angle results in a stronger center light spot and a more rigid resultant light spot.

How to measure the Beam Angle
The beam angle is typically measured using a goniophotometer, a specialized instrument used in lighting measurement. The goniophotometer consists of a rotating platform where the light source is mounted and a detector that measures the intensity of light at different angles. This measurement helps in accurately characterizing and specifying the beam angle of a light source or luminaire.

Two primary methods are used to measure beam angles:
Full Width Half Maximum (FWHM): This method involves measuring the angle at which the light intensity drops to 50% of the maximum intensity. It is determined by placing a photometric sensor at a fixed distance from the light source and rotating it around the center of the beam until the light intensity reaches half of its peak value. The angle at this point is considered the beam angle.

Center Beam Candlepower (CBCP): CBCP is another common method used to measure beam angles, particularly for directional lighting fixtures. It focuses on the intensity of the light at the center of the beam. A photometric sensor is placed at a specific distance from the light source, and measurements are taken at various angles. The angle at which the light intensity is the highest is considered the beam angle.

Both methods provide valuable information about the spread of light and help determine the suitability of an LED fixture for specific applications. It is important to consider the measurement method used when comparing beam angles from different manufacturers to ensure accurate and consistent evaluations.
Importance of Beam Angles
The importance of beam angles in lighting cannot be overstated. Here are some key reasons why beam angles play a crucial role:
Light Distribution: Beam angles determine how light is spread and distributed in space. By selecting the appropriate beam angle, you can ensure that the light reaches the desired areas and objects effectively. Whether you need focused spot lighting or wide-area coverage, the beam angle helps achieve the desired lighting design.

Task Illumination: Different activities require specific lighting conditions. Beam angles allow you to tailor the lighting to suit the task at hand. For example, a narrow beam angle can provide concentrated light for reading or working, while a wider beam angle can offer more diffuse illumination for general activities.

Highlighting and Accentuating: Beam angles help draw attention to specific objects or architectural features. By using a narrow beam angle, you can create a spotlight effect to showcase artwork, sculptures, or other focal points in space. This adds visual interest and enhances the overall aesthetics.
Ambiance and Mood: Lighting significantly impacts the ambiance and mood of a room. The beam angle plays a vital role in setting the desired atmosphere. Whether it’s creating a cozy and intimate setting with soft, focused lighting or generating an open and spacious feel with broad, diffused light, the beam angle contributes to the overall ambiance.
Beam angles are vital in achieving the desired lighting effects, creating ambiance, and ensuring visual comfort and safety. By understanding the importance of beam angles, you can make informed lighting decisions to enhance any space effectively.
Exploring Beam Angle Varieties
Understanding the different types of beam angles allows for precise control over lighting effects and helps achieve desired illumination outcomes for various applications.

Narrow Beam Angles (10-20°)
- Characteristics: High center light intensity, small light spot. Offer a focused and concentrated beam of light.
- Ideal applications :
- Spotlighting: Narrow beam angles are perfect for spotlighting specific objects or areas. They allow you to draw attention to focal points such as artwork, sculptures, or architectural details.
- Accentuating Details: If you have intricate or delicate decorations that you want to highlight, narrow beam angles can effectively showcase their beauty and intricacy.
- Creating Dramatic Lighting Effects: Narrow beam angles are well-suited for creating dramatic lighting effects, enhancing the visual impact, and adding a touch of flair to a space.
Medium Angles (24°-45°)
- Characteristics: Wall-washing, partial illumination.Offer a broader spread of light.
- Ideal applications:
- Wall-Washing: Wide beam angles are excellent for wall-washing, where the light grazes the wall’s surface, creating a soft and uniform illumination. This technique can enhance the architectural features of a space and provide a sense of depth.
- Partial Illumination: If you want to illuminate specific areas or objects without overpowering the entire space, wide beam angles are a suitable choice. They provide adequate coverage while allowing for a balanced distribution of light.
- Creating a Sense of Spaciousness: Wide beam angles can help open up a room and make it feel more spacious by providing a more extensive spread of light. This can be particularly beneficial in smaller or confined spaces.
Wide Beam Angles (45-60°)
- Characteristics: Scattered light, uniform illumination. offer a wide and expansive spread of light.
- Ideal applications:
- Ambient Lighting: Super wide beam angles are well-suited for providing ambient lighting in a space. They can evenly illuminate the entire area, creating a comfortable and well-lit environment.
- General Illumination: If you need to provide general illumination in a room or space without specific focal points, super-wide beam angles are a suitable choice. They ensure uniform lighting distribution across a larger area.
- Creating a Sense of Openness: Super wide beam angles help create a sense of openness by spreading light widely and minimizing shadows. This can be particularly useful in smaller spaces to make them appear more spacious.
Remember, there is no definitive “best” beam angle. The choice depends on the specific requirements of each space. Narrow beam angles excel in creating ambiance and highlighting focal points, while wide beam angles offer uniform illumination and a sense of openness. By selecting the appropriate beam angle, you can enhance the desired lighting atmosphere and optimize the overall lighting design.
How to choose the most suitable light beam angle
The beam angle of a light source determines how light is distributed, and different beam angles are used in different scenarios to create the desired lighting effect. Here’s how different beam angles can be used in various scenarios:

Residential lighting:
- Narrow beam angle (10-20 degrees): This is ideal for accent lighting, such as lighting artwork or other focal points in a room. A narrow beam creates a focused, spotlight effect.
- Medium beam angle (25-40 degrees): This is useful for task lighting in areas like kitchen counters or reading areas. This angle balances focus and coverage.
- Wide beam angle (45-60 degrees): Ideal for ambient or general lighting, providing overall illumination in a room.
Commercial and Retail lighting:
- Narrow beam angle: Primarily used for accent and display lighting, such as highlighting products or features in a retail space.
- Medium beam angle: Perfect for task areas, like office workspaces or hotel lobbies.
- Wide beam angle: Common in warehouses, large retail spaces, or outdoor areas, where broad coverage is needed.
Industrial lighting:
- Narrow beam angle: Used for highlighting specific work areas or machinery.
- Medium beam angle: Can be used in assembly lines where focused yet significant coverage is required.
- Wide beam angle: Ideal for large factories, warehouses, or storage areas requiring a lot of light over a wide space.
Outdoor and Landscape lighting:
- Narrow beam angle: Ideal for spotlighting, like illuminating statues, trees, or architectural features.
- Medium beam angle: Good for pathway lighting, providing enough light for safety without being too harsh.
- Wide beam angle: Great for floodlighting, for lighting up large areas like parks, sports fields, or large yards.
Entertainment Lighting:
- Narrow beam angle: Can create dramatic effects on stage, highlighting performers.
- Medium beam angle: Good for creating wash effects or lighting larger portions of the stage.
- Wide beam angle: Useful for general ambient stage lighting or audience lighting.
| Scenario | Narrow Beam Angle (10-20 degrees) | Medium Beam Angle (25-40 degrees) | Wide Beam Angle (45-60 degrees) |
| Residential | Accent lighting (e.g. lighting artwork) | Task lighting (e.g. kitchen counters, reading areas) | Ambient/general lighting |
| Commercial and Retail | Accent/display lighting (e.g. highlighting products) | Task areas (e.g. office workspaces, hotel lobbies) | Large area lighting (e.g. warehouses, large retail spaces) |
| Industrial | Specific work areas or machinery | Assembly lines | Large factories, warehouses, or storage areas |
| Outdoor and Landscape | Spotlighting (e.g. statues, trees) | Pathway lighting | Floodlighting (e.g. parks, sports fields, large yards) |
| Entertainment | Highlighting performers | Creating wash effects or lighting larger portions of the stage | General ambient stage lighting or audience lighting |
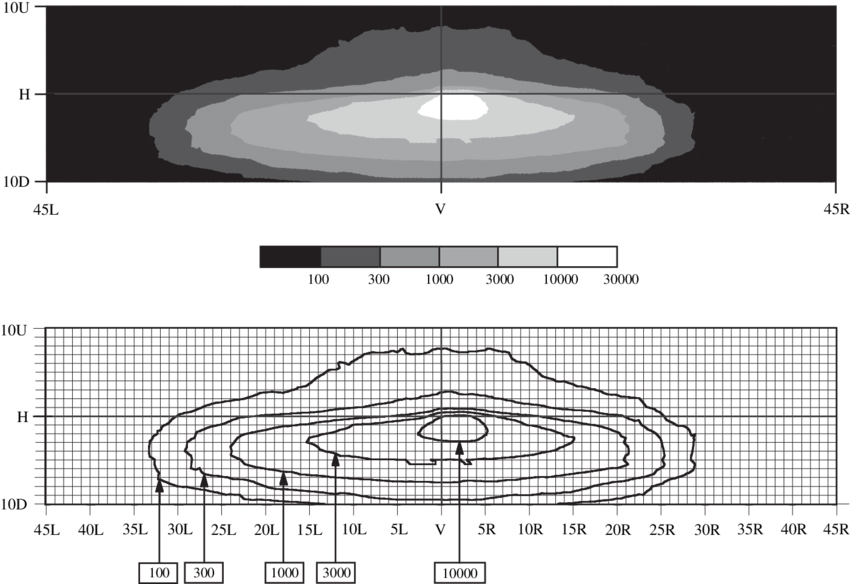
Understanding and Applying Photometric Diagrams
Photometric diagrams provide a visual representation of how light is emitted from a source. They’re essential for lighting professionals, as they depict the intensity and distribution of light in various directions. This information is critical for planning and designing effective lighting systems.

There are two main types of photometric diagrams:
- Isocandela Diagrams: These are polar diagrams that depict light intensity at different angles from the light source. They’re usually shown in two planes: the vertical plane (also known as the C0-C180 plane), which shows the light directly in front of the luminaire, and the horizontal plane (C90-C270 plane), which displays light emitted to the sides.
- Lumen Distribution Curves: These curves represent the percentage of total lumens emitted in each direction. This allows you to see how much light is emitted upward, downward, and to the sides, which can be useful for comparing different light sources.
To understand and apply these diagrams:
- Identify the type of diagram: First, figure out whether it’s an isocandela diagram or a lumen distribution curve.
- Check the scales and units: Ensure you understand the scales and units used in the diagram, as this will affect your interpretation of the data.
- Analyze the data: Look at the shape of the curves or plots on the diagram. This can tell you a lot about the light source. For instance, a symmetrical plot on an isocandela diagram indicates that the light source emits light evenly in all directions.
- Apply the data to your project: Use the information from the diagrams to make decisions about your lighting design. For instance, if you’re lighting a gallery, you might choose a light source with a narrow beam angle (as shown on an isocandela diagram) to highlight the artwork.

Remember that photometric diagrams are just one tool in the lighting design process. You should also consider factors like the color temperature, color rendering index (CRI), energy efficiency, and the specific needs of your project. With this knowledge, you can make informed decisions about your lighting design.
Look at the right side of the diagram, which usually contains explanatory notes. The first line specifically marks the parameters of each light fixture, including the size of the beam angle, power, and color temperature. The first column below indicates the lighting distance of the fixture, the second column shows the diameter of the light spot at different lighting distances, and the third column indicates the illuminance at different lighting distances.
For instance, consider a space with a table that has a diameter of 1.5 meters. If you want the light on the table to be uniform and have weak contrast, you could look at the photometric curve. A 36° beam angle light source at a 2-meter distance gives a light spot with a size of 1.38 meters. This beam angle aligns with our requirement, and the corresponding illuminance value is also clearly mentioned.
Now, what if the table’s diameter is 1 meter? You could use a 36° or 24° beam angle—learn to use them flexibly. But if you want to illuminate only the center of the table while dimming the rest, which one should you choose? Upon calculation, it’s clear that the 10° option is more suitable. This shows that when used for partial lighting or to highlight a certain object, a narrow beam angle is generally adopted.
The area illuminated by different beam angles varies. The brightness within the beam angle will be higher, while the area outside the beam angle will be lower due to indirect lighting.
Conclusion
The beam angle is much like the lens of a camera, it directs and focuses the light, shaping the mood and functionality of your space. Smaller angles focus the light into a spotlight, drawing attention to specific details, while larger angles spread the light out, bathing a room or an area in a soft, even glow.
Imagine this, if you have a beautiful painting or an impressive sculpture that you’d like to highlight in your living room, a smaller angle is your best friend. It’s like shining a spotlight on a stage, emphasizing the beauty and uniqueness of your piece.
Now, think about your workspace or your kitchen. You want it bright and clear so you can focus on your work or cooking. This is where a medium angle comes into play. It’s the balance between focus and coverage, a practical choice for most task-oriented places.
For those vast areas, such as warehouses or parks, where you need as much light as possible, the larger angles are the way to go. They’re the generous souls that distribute light far and wide, ensuring visibility and safety.
At Sinolumi LED Limited, we’re not just about providing lighting solutions, we’re about enhancing experiences. We believe in creating spaces that inspire, comfort, and function with efficiency. Whether it’s for your cozy home, your bustling commercial space, or expansive industrial sites, we have a range of LED solutions that can cater to your specific needs.
Feel free to contact us, we’re here to listen to your needs, share our knowledge, and work together in illuminating your world in the most energy-efficient, high-quality way possible.